So after riding with my Schmidt Nabendynamo for a few weeks last year with an excruciatingly difficult time pedaling, I wised up and spun the wheel by hand - holy smokes the hub was nearly frozen. What to do?
My options for a hub repair include shipping it back to Peter White or to Schmidt in Germany for repair, where the shipping charges alone are more than I wanted to accept. Or I could just repair the hub myself, seeing how the warranty period was expired anyway.
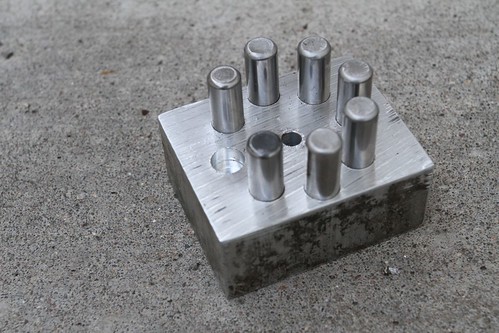
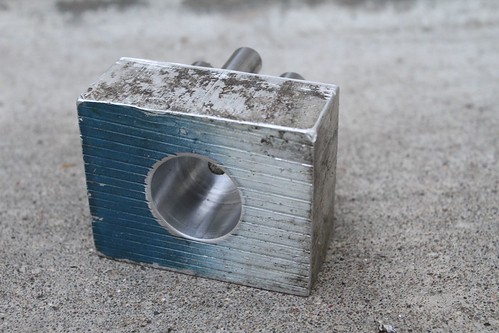
So I decided to make a tool, which with the help of a milling machine, a piece of scrap aluminum, and a handful of the correct diameter pins, didn't take more than about a half hour to manufacture. I had to cut a recess in the back of the tool to accept the skewer, which prevented the tool from slipping off during the removal, but the tool removed the hub armature just as expected.
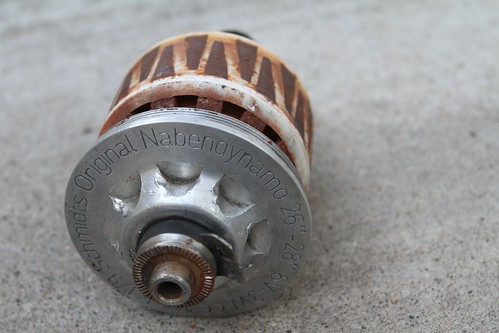
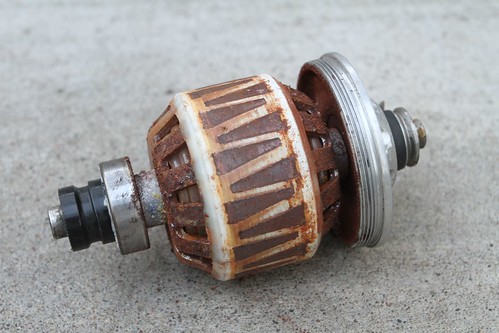
My original thought was that I would have to replace the bearings, but disassembly quickly showed that moisture was the cause of the hub binding; the armature was contaminated with rust, and thick enough that there was a physical interference between that and the field magnets on the outer hub. Dang.
 |
| Schmidt Original Nabendynamo armature core. There was a bit of slippage and resulting damage to the hub until I locked the tool on to the hub with the skewer - no biggie. |
I cleaned up the rust with a fine grit emery paper, lubed it up with a film of grease, put it all back together, and the wheel has been rolling for a year now with no issues.
Note that the new version of the Schmidt hub requires the spokes removed from the hub for disassembly, while the older version here does not require a new wheel build for repair.
Cheers and ride on.


8 comments:
Very impressive, sir. Very impressive indeed.
Ha. "Emery paper". You're funny.
The cup has left or right-hand thread?
Standard left-hand threads here.
Hi,
that is to disassemble, I have to turn counterclockwise?
Thanks.
Rino
Hi,
Nice post. I have the same model of Schmidt hub, and I'm preemptively figuring out how I may replace the bearings (or any other servicing that requires accessing the internals).
The hub cap thread actually looks like it's a right hand thread to me (so it would be counter clockwise to unscrew). A right hand thread would also make sense when considering precession: the hub cap would tend to tighten itself in as the wheel turns; much the same as pedal and bottom bracket threads use different threads on either side to avoid them unscrewing as you're riding.
For the benefit of anyone coming across this thread, I can confirm that the hub cap has a right hand thread (so you need to turn the hub cap counter clockwise to remove the internals).
I know because I had to open mine up, because the bearings are now worn out.
1. I have a SON like yours in the workshop (bearings seized), and I can confirm that the Park Tool BDT-1 tool fits beautifully. You do have to make sure it doesn't slip off, and it has only two engagement points.
https://www.parktool.com/product/belt-drive-sprocket-remover-bdt-1
The tool is intended for removing belt drive sprockets, so it can accomodate various spline diameters, including this one.
Disclaimer - I've not yet managed to open it, I wanted to check the thread direction first.
2. In other news, I know that at least one Shimano hub dynamo is said to lose a lot of generating power if the windings (the "anchor") are removed from the hub shell. I didn't look into the physics at the time, but I would be interested in the experience of anyone who did de-anchor their SON hub.
There is a special iron tool for the Shimano hubdynamo in question, which acts as a substitute hub shell, if you do need to de-anchor.
Just my 2p.
Mark
Edinburgh
Post a Comment